No matter what kind of wood you use on your bathroom floor, It is constantly exposed to moisture and can have a bad effect on bathroom wood. And which can quickly get damaged, and slippery coatings can fall off.
So, if you want to protect your bathroom floor from water, it must have waterproof properties.
After researching I have come up with some simple and sustainable solutions for you about “how to waterproof bathroom floor wood”. Each of the methods in this article is reliable and can be completed at a very affordable price.
So use any of the following methods to keep the floor wood beautiful and shiny finish. So let’s take a look.
How To Waterproof Wood For Bathroom
Method-1: How to Waterproof Bathroom Wood with Oil
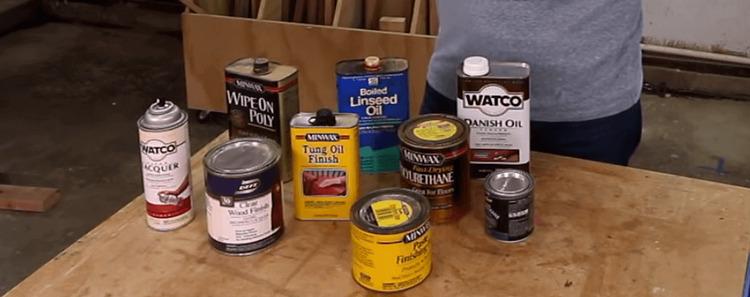
Oil is one of the simplest and best solutions for waterproofing wood. You can usually apply three types of oil to waterproof your wood.
- Linseed oil
- Walnut oil
- Tung oil
We use these oils regularly for our household purposes, which makes them very readily available and affordable. Consider the best oil for waterproofing wood.
You can apply Tung oil on all kinds of wood. This oil basically takes 7-10 days to heal. Tung oil is a bit more expensive than other oils. This oil is non-toxic and safe to use.
It is quite effective for a durable and tough finish and makes the wood more water-resistant than linseed oil. You can get this oil in any grocery store.
Using boiled linseed oil is a great way to waterproof wood. This is very effective in getting a nice and glossy finish on the wood surface. linseed oil is very affordable, but it takes a longer time to heal. You can collect it from any local hardware store.
Tung and linseed oil give better results than walnut oil in waterproofing bathroom wood. Also, you may be allergic to walnut oil
As a result, it’s best to avoid oils, but wood can be waterproofed with this oil. Be careful if you choose this oil.
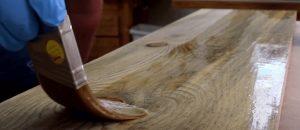
Step-1: Make the wooden surface:
First, you should prepare the wooden surface. In that case, rub the wood surface with sandpaper, and level it.
This time, remove the remaining wood with a brush.
Step-2: Make a mixture of oil:
You can mix turpentine with oil to get better results in waterproofing wood with oil. If you do not have turpentine, you can use apple cider vinegar as an alternative. Shake all the ingredients well this time.
However, you can skip this step if you want.
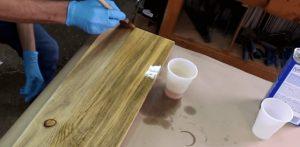
Step-3: Apply first coat:
At this stage, you apply the oil on the wood surface with a bristle brush. In that case, pour a small amount of oil on the wood surface and rub the oil with a brush.
Make sure the oil is evenly coated on each part of the wood.
Step-4: Dry the coat:
Now leave the wood to dry. It may take you about 20-24 hours to dry the wood. However, if you use blending oil, it will dry quickly.
Step-5: Apply two more coats:
Make sure the first coat heals well. At this stage you apply the second coat in the same way.
Similarly, after drying the second coat, you can apply the third coat.
Step-6: Heal the wood completely:
Cure the wood well at this stage. The wood may take 2-3 days to heal. Also Learn, How to waterproof painted wood furniture.
Method-2: How to Waterproof Wood for Shower with a Sealant
The most reliable way to waterproof bathroom wood is sealant. The sealant basically dries very quickly and gives the wood a glossy finish. It is available at very low prices.
You can usually waterproof wood by using three types of sealants. Such as: Varnish, Polyurethane, and Lacquer.
Woodworkers use varnish to waterproof the wood. It provides a dense and durable coating to your wood. Usually, it does not turn yellow after a certain period of time. Varnish is best to use for a durable color finish.
Polyurethane sealant is an easy and reliable way for waterproofing wood. It is basically a mixture of resin and solvent that gives different types of wood a glossy finish.
Lacquer provides a highly durable coat on wood surfaces. If you want to buy the most durable sealant then you can choose Lacquer Sealant. However, it can be toxic and turn yellow after a certain time.
Step- 1: Prepare the wood floor:
If there is any stain or stubborn dirt on the wood, clean it. And rub the wood with sandpaper. Now wipe the surface well using a cotton pad.
Prepare the sealant: Mix the sealers at this stage, and shake well. You can follow the manufacturer’s instructions to do this step.
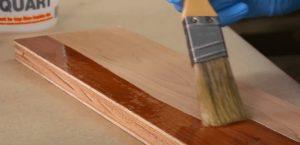
Step- 2: Apply the first coat:
Apply sealant to the wood surface with a paint brush. Coat each part of the wood evenly.
Note: Generally, the sealant should not be used at very high temperatures. Therefore, work in a place with low temperature.
Step-3: Dry the first coat:
The sealant allows drying in a very short time. It takes 5-10 hours to dry.
Step-4: Apply the second coat:
At this stage, rub the surface with a fine-grit sandpaper and apply a second coat of sealant. You can do the third coat in the same way to get better results.
Step-5: Dry the surface:
Heal the wood floor well. Give 1-2 days to dry the wood so that the surface is 100% cured.
Method-3: Waterproofing with Resin and Acetone
One of the easiest and most durable ways to waterproof bathroom wooden floors is to use a mixture of resin and acetone. As a result of wood waterproofing in this process, your wood retains its waterproof properties for up to 5 years.
We suggest you choose a polyester resin to complete this procedure. However, you can use polyurethane resin or synthetic resin. Generally, two types of polyester resins are available. One is laminating resin and the other is finishing resin.
You will need these two types of resins to properly waterproof wood. However, if you want to do the job with any one resin, you can just take the finishing resin.
In this method acetone basically makes the use of resin easier. This is because only the resin is dense which makes it difficult to apply. As a result, the acetone mixture makes the resin thinner and easier to apply.
Step-1: Prepare the wood surface:
The wood floor should be thoroughly cleaned before applying the resin. Rub the wood with a fine-grit sandpaper to level the wood.
And clean the wood dirt. Dry the wood well before applying the resin.
Step-2: Prepare a mixture of resin and acetone:
Take a pot. Pour the resin into the pot according to how much resin you will need on the bathroom floor. At this stage add a few drops of acetone. Make sure the mixture is a little thicker than water.
Step-3: Apply the first coat:
Take a paint brush and soak the brush in the mixture. This time apply it to the wood surface. Make sure the whole wood is evenly coated.
Step-4: Dry the first coat:
Usually, a mixture of resin and acetone dries quickly. It may take 30-60 minutes to dry well.
Step-5: Re-apply the resin coat:
Once the first coat has dried well you apply the second coat in the same way. Remember, resin should be applied very gently. To get good results in this work you need to do 5-6 more coat.
Make a mixture of resin before each coat. If you want to get a glossy coating, add liquid wax to the mixture and apply it to the final coat.
Step-6: Dry the wood well:
After coating all on the surface, dry it well. It takes about 5 hours to dry. Learn how to cure resin faster.
Conclusion
We hope you found this article helpful in learning how to waterproof wood for your bathroom. Each of the methods described are reliable and can be completed at a very affordable price.
Be sure to take the necessary precautions when working with any of the oils or sealants to avoid any health hazards. With a little time and effort, you can have a beautiful and durable bathroom that will last for years to come.