How To Resin Rocks In 5 Easy and Effective Steps
I had a bad experience with resin. When I first tried to seal my painted rock to make it shiny by using resin, I was deceived by my stupidity and guilt. Sadly my painted rock became a ruin.
Because I was ignorant about the correct application. I was fooled without knowing how to resin rocks in the correct way.
The second time I didn’t want to take this risk, I mastered the funny hacks of resin by doing various research. I did find out how to resin in rocks.
Again when I resin the rocks, it was pretty nice results for me. “yes” I did!
So today I will share with you how to resin in the painted rock. And I believe that if you follow it completely, You will get amazing results for the first time.
Basically, your paint is a resin to give a shiny finish to the rock. That makes your rock paint more durable. So, let’s make the rock shiny.

Read also:
5 Best Resin For Rocks – To Make The Rocks More Shiny
Top 12- Best Paint For Rocks (Waterproof) In 2024
SUPPLY NEEDED RESING COATED ROCKS:
- Plastic Matt
- Measuring spoons
- Plastic container
- Wooden stir sticks
- Paintbrush
- Rubber gloves
- Mixing container
- Art Resin (both resin and hardener needed)
- Straw (for removing bubbles)
- Alcohol-based hand sanitizer
HOW TO RESIN PAINTED ROCKS
Surely, the resin is a simple and effective process, just needs to be applied properly. For your convenience, we have described step-by-step application rules.
STEP- 1:
Wear hand gloves. Determine how much rock resin you will do. Take resin and hardener in equal proportions in a container.
- If you take 1 tablespoon of resin, then take 1 tablespoon of hardener. Wipe the spoon well and keep it sanitized.
STEP- 2:
Mix the mixture well with the wooden Stir sticker, stir well for 5 minutes. And make sure there are no bubbles. Leave the mixture for 10 minutes.
STEP- 3:
Take the plastic mate, Decorate your rock on top of it. The sealed resin does not stick to the surface. And the sealed shells can be easily separated even after 12 hours.
- Make sure your paint is dry before applying it on the rock for a bubbles-free and great finish.
STEP- 4:
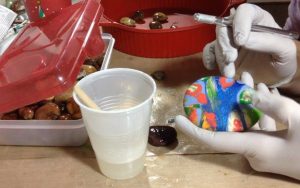
Take the rocks and take the resin mixed with the help of a paintbrush and brush the stones well and coat them in equal proportions properly.
Since you are wearing gloves, you can carefully cover the rock with resin in a hand.
STEP- 5:
Make sure that there are bubbles in the sandstone. To remove the bubbles, blow a few inches away with the help of a straw. Be careful not to let moisture get into the rock.
You can also use a torched to remove the bubbles. Place the torched at a distance of a few inches from the target of the bubbles. And carefully move the torched for a long time.
- Moisture, dust, hair and if you do not mix the mixture well, you can get bad results from your resin.
- Leave the rock to dry well for at least 24 hours at the end of the resin.
CONCLUSION
By following these full guidelines properly, surely, you can get the results you want. And I hope you will have a great experience for the first time.
Then make your rock shiny. And share with us the fun experience of your resin.


