How to Waterproof Leather Boots – Step by Step Guide
Walking around with wet feet is just unbearable, and the smell after taking your feet out of the shoes is not very wonderful either. Furthermore, the dampness affects the material of the shoes and damages them, making them unwearable.
If you want to keep your leather boots water-free regardless of the season and work situation, read this article. In this article, we will discuss how to waterproof leather boots step by step, so waterproofing boots become a piece of cake for you.
When to Waterproof Leather Boots
Now you need to keep in mind that shoes are often made to be waterproof. You should waterproof your leather boots when waters stop making beads on the surface of your boots.
Also, when you notice that more dirt and grimes are sticking to your boots than usual. You also need to keep in mind that leather boots cannot be made completely waterproof, rather you can slow down the water from penetrating inside the boot.
How to Waterproof Leather Boots
There are several ways you can waterproof leather boots.
- With cream, paste, or wax
- Waterproof sprays
- Some temporary measures
Things you will need to start waterproofing leather boots:
- Stiff brush
- Saddle soap or footwear washing gel
- Urethane sealant
- Soft, clean, and lint-free cloth
- Cream, paste, or wax
- Waterproof sprays

Waterproofing Boots Using Wax, Cream, or Paste
This is the best way to waterproof boots, but it requires your time and quite a lot of elbow grease.
-
Step-1: Prepare the Boots for Treatment
If your boot is not well worn, then break in the leather boots by roaming around in your home wearing them or go for a walk around the neighborhood. Yes, you have to do that even if you have the best waterproof tactical boot.
-
Step-2: Clean the Boots
Remove the laces from the shoes and clean the boots. Before you can apply any sort of waterproofing treatment, it is very important for you to thoroughly clean the boots. This is because dirt and grimes can hamper the treatments to thoroughly penetrate the surface of your leather boots.
So, with a stiff brush and saddle soap or footwear washing gel, thoroughly but gently scrub away all dirt and grime. If dirt has become stiff and caked on the sole, soak it in about an inch of water for it to soften. Then wash it away with a hose.
-
Step-3: Dry the Boots
Wipe away excess water and pat dry the boots. Leave it to air dry in a sunny place but not directly under the sun. When it is a little damp, collect the boots as they are ready for treatment.
If your boots are new, it is a good idea to apply some oil in order to soften the leather rather than washing it. Treatments work better on soft leather.
-
Step-4: Sealing the Seams
You can seam-seal the edges of your boot for extra protection. Seam-sealing not only helps keep water out of your shoes, but it can also help to keep the sole remain attached to the upper part of your boots. However, you must apply it before you start waterproofing treatment on the boots.
With a hairdryer warm the side of the boots first as warm leather can absorb sealant faster. One of the most efficient ways of applying this sealant is just running it along the stitched seam with a syringe.
-
Step-5: Wax, Cream, or Paste
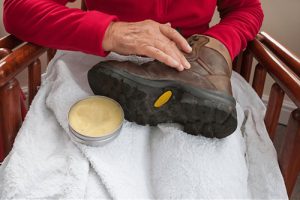
If you are using cream, paste, or wax to waterproof boots, then grab a clean cloth and put a generous amount of wax, paste, or cream in it. In a circular motion, make sure to thoroughly spread the treatment in every nook and cranny of the shoes.
Spend at least a couple of minutes rubbing the wax, paste, or cream in each boot. With another piece of clean cloth, wipe off any excess from the boots.
-
Step-6: Leaving It Overnight
After the application of the treatment, leave the shoes to dry overnight. This is because if the shoes feel sticky, it means the treatment has not dried properly and so will not work. So let it dry out properly overnight.

Waterproofing with Spray
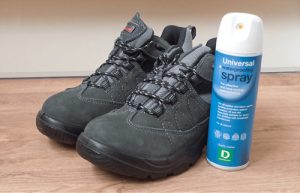
While this is not the best waterproofing method, it is still quite a good option if you lack the time or do not want to spend time buffing shoes.
Now the kind of spray you will need to use varies due to the type of material. If your leather boots look and feel really smooth, it is most probably tightly-grained leather, and so silicone or oil-based waterproofing sprays are best for them.
Whereas for more hairy-looking leather boots, that is boots made of suede or nubuck leather, using water repellent sprays will be best.
-
Step-1: Clean the Boots
Clear your leather boots of all dirt and grime with a soft brush and soap or footwear washing gel. Wash the soap and dirt away with water.
-
Step-2: Dry the Boots
Leave it to dry naturally for a while until it’s slightly damp.
-
Step-3: Waterproof Spray to Treat the Boots
Spray while holding the can 6 inches away from your leather boots. There is no need to put thick coats on the shoes. Read the instructions on the spray can because some require multiple sprays while once is enough for some brands.
-
Step-4: Let It Dry Overnight
After spraying, leave the boots to dry naturally overnight, so it’s cured properly.
Temporary Waterproofing Method
While these two methods are the best way of waterproofing tactical boots, there are some temporary measures you can use in very urgent situations. But keep in mind, they will last for a short while and will not be as effective as the two methods above.
Vaseline or Transmission Oil
Yes, these ordinary household products can make your shoes waterproof for a short while. Apply it as you would apply oil, wax, or cream that is rubbing it all over the shoe. However, this will last for a very short time.
Final Words
It is very important to keep water from getting inside your shoes, and now you know how to waterproof boots and the best way to waterproof boots.
Do remember that these methods need to be repeated often because shoes cannot permanently be made waterproof. To give your essential, trustworthy, and well-worn boots higher longevity, waterproof them regularly.


