
If there’s one thing that can ruin your camping experience, it’s rain. Especially if it leaks into your tent and floods your floor. That’s why waterproofing your tent is such an essential part of camping and taking care of your tent.
We bet you have lots of questions about waterproofing your tent, like how to waterproof a tent, when is the right time to do it, what are the different ways and the best products to use for it.
There’s no need to worry because we’ll tell you everything you need to know about waterproofing your tent right here. With our detailed step-by-step guidelines, you’ll be able to enjoy camping to the fullest without a drop of rain to ruin it.
Why Waterproof Your Tent?
You might be wondering that if you’ve bought a water-resistant tent, why will you need to waterproof it again. Tents endure the worst side of any weather. Be it sun, rain, or wind as it protects you from them, the tent fabric may become compromised. The UV rays, dirt, mud get absorbed and make the tent less effective over time.
Not to mention the seams around the tent may lose their strength and break or get damaged. This will cause water to leak into your tent.
When Is the Right Time to Waterproof Your Tent?
There are three ways water can leak into your tent.
- Damaged seams
- The compromised fabric of the tent
- Leaky rainfly
First, you need to identify where the problem is, then you can take the necessary steps. You need to check your tent before you go on your camping trip because you don’t want to find out that your tent needs waterproofing as rainwater drips on your head.
On a sunny day, set up your tent in your backyard and spray water on it. Check the outside of the tent, and if there are lots of beads of water that are rolling off the tent, then it’s fine. If not, then you’ve got work to do.
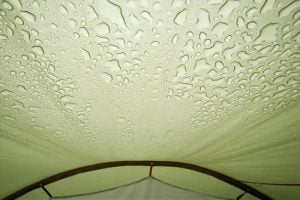
Then check the inside for any water that might have penetrated through seams or the fabric.
Waterproofing the Tent
Tents come in many different fabrics. It’s important to know the fabric of your tent as different fabrics need different kinds of sealant. Find out the kind of fabric that your tent is made of and get a waterproofer spray for tents for that fabric. Follow these simple steps to waterproof your tent.
-
Step-1: Wash Everything
Before you put anything on your tent, you need to make sure there is no dirt, debris, or mud sticking to your tent. You can use water mixed with a soft detergent and a sponge to wash your tent to do it. And if you see any seam sealing peeling off, use rubbing alcohol to clean them.
-
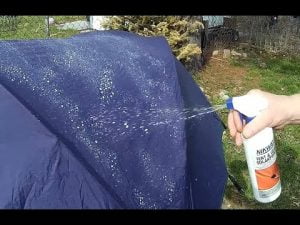
Step-2: Apply a Tent Waterproofing Spray
Once you’ve cleaned everything, you can spray the DWR (durable water repellent) spray in your tent. You don’t need to apply too much, spray just a thin layer evenly across the tent. Don’t spray on the mesh parts of your tent if there is any.
-
Step-3: Wipe off Excess
Take a damp cloth and wipe off any residue of the spray on the surface of the tent.
-
Step-4: Clean and Dry the Seams
The seams of the tent are all over the tent. It’s where two parts of the fabric meet. They’re at the corners, around the zippers, doors, and windows, and anywhere there are stitches.
Just like when you waterproof the fabric, you need to make sure that the seams of the tent are cleaned and dry before you waterproof them. If there are peel-offs, use rubbing alcohol to clean the seams.
-
Step-5: Apply Sealant
Use a brush or an applicator and apply a thin layer of sealant over the seams of the tent. Go over the inside of the seams as well as the outside. This way, you’ll be double sealing the seams and adding extra protection.
-
Step-6: Waterproof the Floor of Your Tent
Tent floors are usually known as bathtub floor because the floor goes up a few inches to the wall. This way, the seams are not on the ground so they won’t be damaged easily.
Making sure that the floor is waterproof is essential because if water somehow gets on the floor, it’ll ruin all your gears, backpacks, pillows, sleeping bags, and anything that’s on the ground.
-
Step-7: Clean the Floor of the Tent
Before putting in any waterproof spray on the floor, it has to be clean. So make sure there is no dirt or mud on the floor and on the seams of the floor.
-
Step-8: Apply Sealant on the Seams
After choosing the correct sealant for your tent, apply a thin layer over the seams of the floor. If you want, you can do a double coating since it’s the floor which is more prone to wear and tear.
-
Step-9: Apply Sealant over the Floor
Once you’ve sealed the seams, you can now apply the sealant all over the floor area. You can use a bigger brush to help you cover the whole area quicker and more easily.
-
Step-10: Waterproof the Rainfly
The rainfly is an extra covering over your tent. This, in and of itself, is a way to waterproof your tent as it stretches over your tent, protecting it from directly being affected by the weather.
All you have to do is make sure it’s clean and dry, then apply a tent waterproofing spray, wipe off any excess then let it dry.
-
Step-11: Let the Tent Dry after Spraying
Whether it’s the tent fabric, the seams, the floor, or the rainfly, give it 8 to 12 hours for it to dry. If you can leave it for 24 hours, that would be best. Or read the instructions on the product and act accordingly. This is an important step because if the spray doesn’t dry properly, the water repellent will not work.
If you’re planning a camping trip somewhere you know has a lot of heavy rainfall, then you can apply more than one coating of waterproof spray. Just make sure you dry your tent before applying a second coat.
CONCLUSION
That’s it! It’s that simple. Even the best waterproof tents need to be re-waterproofed after using it a few times. Waterproofing your tent will ensure that you can use your tent for a long time.
Also, some of the best waterproof sprays are very cheap, and with prolonged tent life, you’ll definitely be saving money in the long run.