
There are many benefits to having a wireless doorbell. Wireless doorbells are easy to install, they don’t require any wiring, and they’re very versatile. You can put them anywhere in your home, and they’ll work with any type of door.
Here’s how to install a wireless doorbell in your home.
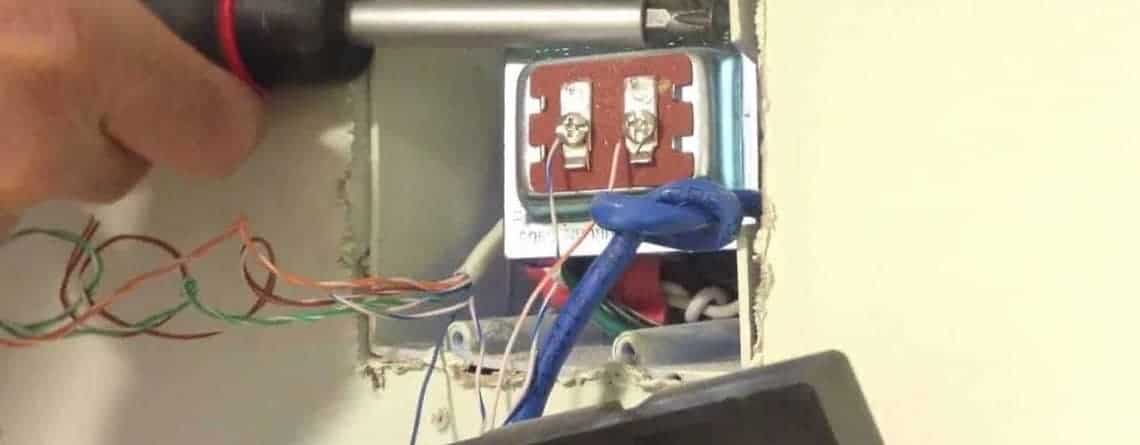
- Turn off the power to your doorbell at the breaker box.
- Remove the old doorbell button from the wall.
- Mount the wireless doorbell receiver on the wall using screws or double-sided tape.
- Place batteries in the transmitter, and then press the “test” button to ensure that it’s working properly.
- Reattach the faceplate to the transmitter, and then turn on the power to your doorbell at the breaker box.
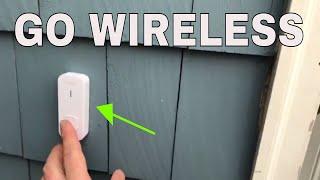
Easy To Install Wireless Doorbell
How to Install a Battery Operated Doorbell
Installing a battery-operated doorbell is a quick and easy way to add some extra security to your home. Here are the steps you need to take in order to install one:
1. Choose the location for your doorbell. It should be close to the main entrance of your home, but out of reach of any potential intruders.
2. Drill a hole in the wall at the chosen location, using a drill bit that is slightly smaller than the diameter of the doorbell mounting bracket.
3. Insert the doorbell mounting bracket into the hole and screw it into place.
4. Attach the battery-operated doorbell unit to the mounting bracket using screws or bolts, depending on what type of unit you have purchased. Be sure that the unit is securely attached so that it cannot be easily removed by an intruder.
5. Connect the wires from the doorbell unit to those on the transformer (this will typically be included with your doorbell kit). Most units will have two wires – one black and one white – but some may have three (two blacks and one white). The black wire is always connected to the “hot” side of 110 volts AC power, while white goes to neutral and green or bare copper goes to the ground (if there are three wires).
You can use wire nuts or terminal blocks (included in most kits) for this connection; just make sure all connections are tight and secure so that there is no danger of electrical shock. If you are unsure about making these connections, please consult an electrician before proceeding further!
6. Hang up any decorative covers or plates that came with your kit, then test your new doorbell by pressing its button!
How to Install a Wireless Ring Doorbell
One of the newest trends in home security is the wireless ring doorbell. This type of doorbell uses a battery-operated transmitter to send a signal to a receiver that is connected to your existing doorbell wiring.
This allows you to hear the doorbell from anywhere in your home, even if you are not near the front door.
Here is a step-by-step guide on how to install a wireless ring doorbell:
1) Choose a location for the receiver. The receiver will need to be close enough to the front door so that you can hear it, but it also needs to be in an area where there is an electrical outlet.
2) Install the batteries in the transmitter. Make sure that they are fresh batteries so that they will last longer.
3) Follow the instructions that come with the wireless ring doorbell kit to connect the transmitter and receiver. Each kit will be slightly different, so make sure that you read the directions carefully.
4) Hang or mount the transmitter near your front door according to the instructions. Again, each kit will have slightly different requirements, so make sure that you follow all of the instructions carefully.
5) Test out your new wireless ring doorbell by ringing it from outside of your house!
Best Wireless Doorbell
Wireless doorbells are a great way to add an extra layer of security to your home. They work by sending a signal from the doorbell button to the receiver, which is usually located near the front door. When someone presses the doorbell button, the receiver will emit a loud chime, alerting you that someone is at your door.
Most wireless doorbells come with two parts – the transmitter (doorbell button) and the receiver. The transmitter is usually battery-powered and can be mounted anywhere near your front door. The receiver, on the other hand, must be plugged into an electrical outlet.
It’s important to note that wireless doorbells operate on radio frequencies, so they may interfere with other wireless devices in your homes such as cordless phones or WiFi routers.
When choosing a wireless doorbell, it’s important to consider range, battery life, and installation options. Most wireless doorbells have a range of about 300 feet, but some models can extend up to 500 feet or more.
As for battery life, most transmitters will last for several years before needing to be replaced. And finally, installation is pretty straightforward – most receivers come with adhesive strips or screws for mounting. If you’re looking for an extra layer of security for your home, a wireless doorbell is a great option.
With easy installation and long-lasting batteries, they offer convenience and peace of mind. After considering all of this we listed some of the best waterproof wireless doorbells that you can check from here.
How Do Wireless Doorbells Work
Wireless doorbells have come a long way in recent years. No longer are they just simple push buttons that make a noise.
Now, they can be integrated with your home security system, allowing you to see who is at the door and even talk to them before you open it.
But how do these modern marvels work?
Wireless doorbells use radio waves to communicate with the receiver inside your home. The transmitter, which is usually mounted near the front door, sends out a signal whenever someone presses the button.
The receiver picks up this signal and then activates the chime or ringtone that you have programmed it to play.
Some wireless doorbells also come with built-in cameras so that you can see who is at the door without having to open it.
These models typically require batteries, although some may come with a solar panel option for powering the camera.
Aida Wireless Doorbell Installation
Installing a wireless doorbell is a quick and easy way to add an extra layer of security to your home. Here’s how to do it:
1. Choose a location for your doorbell. It should be close to the front door, but out of reach of any potential intruders.
2. Drill a hole in the wall for the doorbell wire. Route the wire through the hole and into the house.
3. Connect the wire to the doorbell button and screw it into place. Then, connect the other end of the wire to the receiver unit, which can be plugged into an outlet inside your home.
4. Test your new doorbell by pressing the button to see if it rings inside your home!
Huanhua Wireless Doorbell Instructions
Installing a wireless doorbell is a great way to add an extra layer of security to your home. Here are some simple instructions on how to do it:
1. Choose a location for your doorbell. It should be close to the front door, but out of reach of any potential intruders.
2. Drill a hole in the chosen location, and insert the wireless doorbell receiver.
3. Mount the transmitter onto the wall near the front door, using the screws provided.
4. Test the system by pressing the “test” button on both the transmitter and receiver. You should hear a chime coming from inside your home.
Honeywell Wireless Doorbell

![]() If you’re looking for a wireless doorbell that’s easy to install and provides clear, reliable sound, the Honeywell Wireless Doorbell is a great option.
If you’re looking for a wireless doorbell that’s easy to install and provides clear, reliable sound, the Honeywell Wireless Doorbell is a great option.
This battery-operated doorbell can be placed anywhere in your home, and it comes with four different chime options so you can choose the one that best fits your needs.
The Honeywell Wireless Doorbell also has an LED light that flashes when someone rings the bell, making it easier to see if someone is at the door even if you’re not near it.
Omeril Wireless Doorbell Instructions
If you’re looking for an easy-to-use, reliable wireless doorbell, look no further than the Omeril Wireless Doorbell. This sleek and simple device can be installed in just minutes, and provides clear, concise instructions right on the box.
Here’s everything you need to know about getting started with your new Omeril Wireless Doorbell.
First things first – choose a spot to install your doorbell that is within range of your home Wi-Fi network. Once you’ve found the perfect location, simply remove the adhesive back from the doorbell and stick it in place.
Next, download the free Omeril app onto your smartphone or tablet.
Once the app is installed, open it up and follow the on-screen instructions to connect your doorbell to your home Wi-Fi network.
Once that’s done, you’re ready to start using your new wireless doorbell! To ring the doorbell from the outside, simply press the button on top of the unit.
You’ll see a blue LED light flash to let you know that the doorbell has been rung.
Inside your home, you’ll receive a notification on your smartphone or tablet via the Omeril app letting you know someone is at the door. Then, just tap on the notification to open up two-way audio so you can speak with whoever is outside!
The Omeril Wireless Doorbell is powered by 4 AA batteries (not included), so there’s no need to worry about wiring or power outlets.
Credit: www.1800doorbell.com
How Do You Connect a Wireless Doorbell?
Most wireless doorbells come with easy-to-follow instructions and can be connected in a matter of minutes. Here are the basic steps:
1. Choose a location for the doorbell. It should be close to the door, within range of the receiver, and away from any metal objects or other devices that could interfere with the signal.
2. Mount the doorbell according to the manufacturer’s instructions.
3. Plug in the receiver into an AC outlet, and make sure it’s in range of the doorbell (usually about 100 feet).
4. Follow the manufacturer’s instructions to pair the receiver with the doorbell button.
5. Test the system by pressing the button – you should hear a chime inside indicating that it’s working properly!
Is It Easy to Install Wireless Doorbell?
Installing a wireless doorbell is a fairly easy process that most people can do without any issues. The first thing you need to do is purchase the wireless doorbell kit of your choice. Once you have the kit, read the instructions carefully before beginning the installation.
In general, you will need to mount the doorbell button near your front door and connect it to the chime unit, which can be placed inside your home.
You may need to drill some holes and use screws or nails to secure the button and chime unit in place. Once everything is mounted, follow the instructions in the kit to pair the button with the chime unit.
This usually involves pressing a button on both units until they are properly connected. After they are paired, test out your new wireless doorbell by pressing the button!
What Do You Need for a Wireless Doorbell?
If you’re looking to add a wireless doorbell to your home, there are a few things you’ll need to consider. Here’s what you’ll need for a wireless doorbell:
1. A power source: Wireless doorbells need to be powered in order to work. You can either plug them into an existing electrical outlet or use batteries. If you go the battery route, make sure to get rechargeable batteries so you don’t have to keep buying new ones.
2. A wireless receiver: This is what will receive the signal from the doorbell and relay it to whatever device you have it connected to (e.g., your smartphone). Most receivers come with a built-in speaker so you can hear the doorbell even if you’re not near it.
3. A transmitter: The transmitter is what sends the signal from the doorbell button to the receiver. Make sure that the transmitter has a good range; otherwise, it won’t be able to reach the receiver if it’s too far away.
4. A doorbell button: This is, of course, necessary for actually ringing the doorbell!
Do Wireless Doorbells Need to Be Plugged In?
Wireless doorbells are a great way to add an extra layer of security to your home. But do they need to be plugged in? The short answer is no, wireless doorbells do not need to be plugged in.
They rely on batteries for power and can be placed anywhere in your home, without the need for an electrical outlet. But why battery-powered? The main reason is that it makes installation much easier.
You don’t have to worry about finding a place to plug it in, or running any wiring through your walls. And if you ever need to move the doorbell, it’s as simple as taking it down and putting it back up in a new location – no electrician required.
Another advantage of wireless doorbells is that they’re often more affordable than their wired counterparts.
This is because there’s no need for professional installation, and the materials needed are typically less expensive. So if you’re looking for a cost-effective and easy-to-install security upgrade for your home, a wireless doorbell is a great option.
Just be sure to choose one with long battery life so you don’t have to worry about replacing the batteries too frequently.
Conclusion
Installing a wireless doorbell is a great way to add an extra layer of security to your home. Overall, the installation process was pretty simple and straightforward.
The hardest part was probably running the wire through the doorframe, but other than that it was pretty easy. The wireless doorbell is working great and we haven‘t had any issues with it.
Here are some tips on how to install a wireless doorbell:
1. Choose a location for the doorbell that has good coverage from your WiFi router.
2. Make sure the area around the doorbell is clear of any obstructions, such as furniture or plants.
3. Install the batteries in the doorbell according to the manufacturer’s instructions.
4. Download and install the app for your wireless doorbell on your smartphone or tablet.
5. Follow the instructions in the app to connect your device to your WiFi network and register the doorbell.
![Read more about the article How To Make Waterproof Stickers [All Methods Included]](https://theconsumertips.com/wp-content/uploads/2022/09/How-To-Make-Waterproof-Stickers-300x140.jpg)